In summary:
- Achieving silky, non-gritty cashew cream is possible without a high-end blender by using specific soaking and blending techniques.
- Understanding the “why” behind each step—from nut grade to flavor balancing—is the key to unlocking true dairy-free versatility.
- You can build complex, cheesy flavor that goes beyond basic nutritional yeast by using methods like toasting and flavor pairing.
- Cashew-based alternatives can outperform dairy in certain applications, like lasagna, due to their superior binding properties and lower moisture content.
For anyone who has embraced a vegan or dairy-free lifestyle, the quest for creamy textures can be a frustrating journey. You’ve likely followed a recipe for cashew cream cheese or sauce, only to be met with a grainy, slightly nutty result that’s a pale imitation of the real thing. It’s a common story, one that often leads to the conclusion that you either need a blender that costs a small fortune or must simply settle for subpar alternatives.
Most advice stays on the surface: soak your cashews, add lemon juice, blend until smooth. But what if the secret isn’t in a more powerful motor, but in a deeper understanding of the ingredient itself? This is where the culinary alchemy begins. Transforming the humble cashew into a luxurious cream, a tangy cheese, or a stable, foamable milk is an art of controlled technique. It’s about texture engineering and flavor architecture, not just mixing ingredients.
This guide moves beyond the basic recipe. We are going to explore the craft from the perspective of a cheesemonger. Forget the platitudes. We will delve into the science of soaking, the secrets to achieving impossible smoothness with any blender, and the methods for building flavor profiles that are rich, complex, and convincingly cheesy. You’ll learn not just what to do, but precisely why you’re doing it, empowering you to create dairy-free masterpieces that don’t just substitute, but truly shine.
Contents: The Craft of Cashew Transformation
- Why You Must Soak Cashews Before Blending for Cream Cheese?
- How to Get Gritty Cashew Cream Smooth Without a $500 Blender?
- Whole vs. Pieces: Which Cashew Grade Saves Money for Sauce Making?
- The Allergen Risk When Cooking Cashew Cheese for Guests
- How to Neutralize the Nutty Flavor for Sweet Cream Desserts?
- Nutritional Yeast 101: How to Use “Nooch” for Cheesy Flavor?
- Constructing the Perfect Vegetable Lasagna: Preventing the Watery Mess
- Which Dairy-Free Nut Milk Innovation Foams Best for Latte Art?
Why You Must Soak Cashews Before Blending for Cream Cheese?
The first step in nearly every cashew cream recipe is non-negotiable: “soak the cashews.” But why? Many believe this is to neutralize phytic acid, an anti-nutrient found in nuts and seeds. However, the primary reason is far more practical and crucial for achieving a luxurious texture. Soaking is the first step in our texture engineering process. When raw cashews absorb water, they soften dramatically, making them infinitely easier for a blender’s blades to break down completely. This process of particle hydration is what prevents a gritty or mealy final product.
While some are concerned about phytates, recent research indicates that soaking nuts has minimal impact on phytate levels, with changes being negligible for cashews. Therefore, the focus of soaking should be entirely on texture. The method you choose—a quick hot soak or a longer cold soak—involves a trade-off between time and nutrient preservation. For most culinary applications where texture is paramount, either method is effective, but understanding their differences allows you to adapt to your schedule and needs.
To truly master this foundational step, it’s helpful to see the methods side-by-side. The choice you make here will directly influence the ease of blending and the final mouthfeel of your cheese or cream.
| Method | Time | Temperature | Final Texture | Nutrient Impact |
|---|---|---|---|---|
| Quick-Soak (Boiling Water) | 15-20 minutes | 100°C/212°F | Very soft, easy blend | Some vitamin loss |
| Cold-Soak (Room Temp) | 2-3 hours | 20-25°C/68-77°F | Moderately soft | Minimal nutrient loss |
| Overnight Soak | 8-12 hours | 20-25°C/68-77°F | Perfectly plump | Preserves most nutrients |
Ultimately, soaking is not a nutritional hack but a mechanical one. It’s the essential prep work that sets the stage for a silky-smooth transformation, regardless of the power of your blender.
How to Get Gritty Cashew Cream Smooth Without a $500 Blender?
The myth that a velvety cashew cream is only achievable with a high-speed, commercial-grade blender is one of the biggest barriers for home cooks. The truth is that technique, not just horsepower, is the key to a flawless texture. The secret lies in a professional method I call the “Double Blend Technique,” which focuses on complete particle hydration and emulsification. This approach gives the cashew particles time to fully absorb liquid, making them softer and easier to pulverize in a second blending phase.
It’s a patient process that coaxes smoothness out of the cashews rather than trying to force it with brute power. The resting period in the fridge is the most crucial, yet often overlooked, step. It allows the starches and fibers to swell, transforming the slightly grainy mixture into a uniform paste that’s ready for its final polish. For an absolutely perfect, mirror-like finish, a final pass through a fine-mesh sieve is the ultimate pro move. It removes any last microscopic particles that even the best blenders might miss.
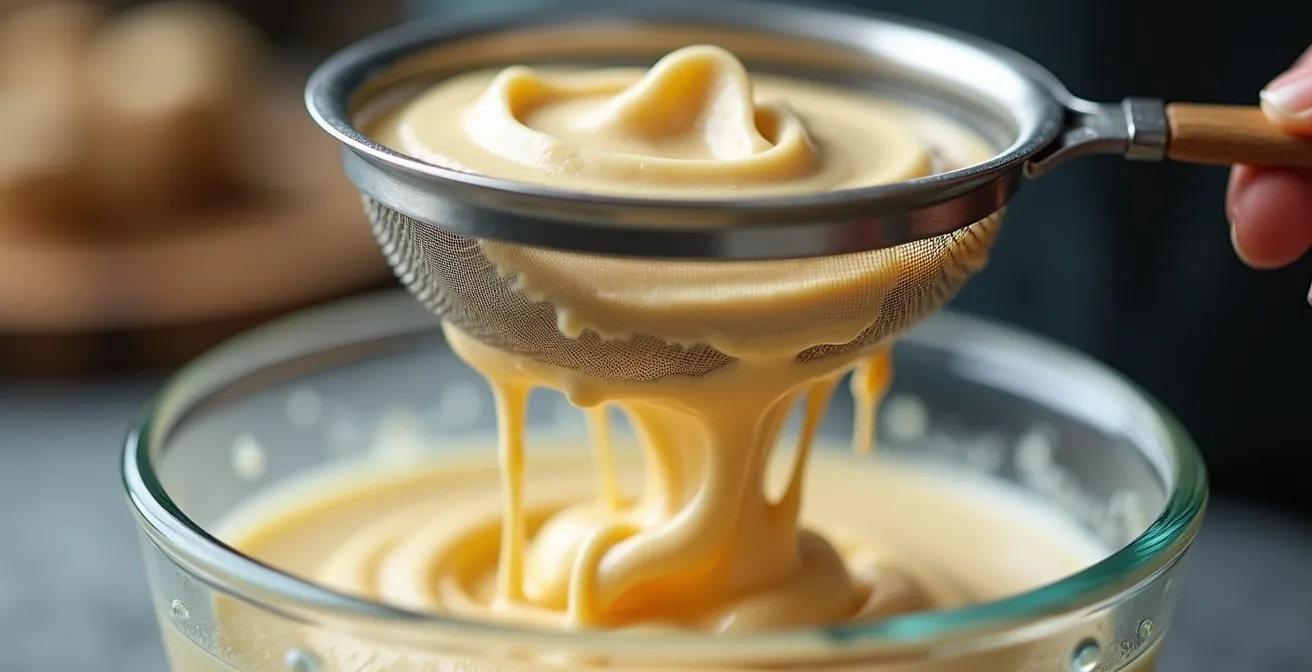
This final straining step, as shown above, is the difference between “good” homemade cream and one that feels professionally made. The process may take a little longer, but the result is undeniable. Follow these steps for flawless texture every time:
- Initial Blend: Blend your soaked cashews with liquids (using very hot, not boiling, water helps fats emulsify) for 2-3 minutes until it appears as smooth as your blender can get it.
- Rest and Hydrate: Transfer the mixture to the fridge and let it rest for 30-60 minutes. This is where the magic of full particle hydration happens.
- Second Blend: Return the chilled, thicker mixture to the blender and process it again for another 1-2 minutes. You’ll notice it becomes significantly creamier.
- The Silky Finish: For an ultra-smooth, luxurious finish, pass the cream through a fine-mesh sieve, pressing on the solids with a spatula to extract every drop of silky liquid.
Whole vs. Pieces: Which Cashew Grade Saves Money for Sauce Making?
When standing in the bulk aisle, it’s tempting to reach for the pristine, whole cashews. They look superior, and we’re conditioned to believe that “whole” means “better.” However, in the world of cashew cream and cheese making, this is a costly mistake. For any application that involves blending, cashew pieces are not only equal in quality but are also significantly more economical. Biochemically, a broken cashew is identical to a whole one; its only “flaw” is cosmetic.
Since the nuts are destined for pulverization, their initial shape is completely irrelevant. By opting for grades like ‘LP’ (Large Pieces) or ‘SP’ (Small Pieces), you are buying the exact same ingredient for a fraction of the cost. This isn’t just a minor discount; it can represent a substantial saving over time, especially for those who make cashew-based staples regularly.
Case Study: Cost Analysis of Cashew Grades for Blending
A practical cost analysis reveals a significant price difference. For applications like sauces and creams, cashew pieces are biochemically identical to their whole counterparts but, as a breakdown of cashew grades shows, can cost up to 40% less. For a home cook making a two-cup batch of cashew cream each week, choosing pieces over premium W-180 whole cashews can lead to an annual saving of over $150. The smartest shoppers often find the best prices at Asian and Indian grocery stores, where cashew pieces are sold as a cooking staple rather than a premium snack food.
To maximize these savings, it pays to be a savvy shopper. Buying in bulk and storing properly ensures you always have this versatile ingredient on hand without paying the premium for aesthetics.
- Shop the bulk bins at health food stores, where cashew pieces are often 30-40% cheaper than their packaged, whole counterparts.
- Explore Indian and Asian grocery stores, as they typically sell pieces as a standard cooking ingredient at a lower price point.
- For maximum savings in blended recipes, seek out the ‘SP’ (Small Pieces) grade.
- If you buy in large quantities, store your cashews in the freezer to maintain their freshness for up to six months.
- For very large purchases (over 5 pounds), consider looking at online nut wholesalers.
The Allergen Risk When Cooking Cashew Cheese for Guests
As creators of plant-based cuisine, we celebrate the power of nuts to replicate dairy’s richness. However, this creativity comes with a profound responsibility: managing allergen risk with extreme seriousness. A tree nut allergy can be severe, and cross-contamination in the kitchen is a real danger. When preparing food for guests, you must operate with the same level of diligence as a professional kitchen, treating cashews with the caution reserved for handling raw poultry.
This means establishing a strict protocol for cleaning and separation. Surfaces, utensils, and especially blenders—which have many hard-to-clean parts—must be meticulously sanitized. The best practice is to prepare all nut-free dishes first, cover and store them away, and only then begin work on your cashew-based recipes. Clear labeling is not an optional aesthetic choice; it is a critical safety measure. As one professional chef who transitioned to vegan cuisine shared, effective communication is just as important as a clean workspace.
As a professional chef who transitioned to vegan cuisine, I learned that treating nut allergies with the same seriousness as raw chicken contamination is crucial. We maintain separate prep zones, use color-coded equipment, and always prepare a visually distinct nut-free alternative like sunflower seed cream. Clear communication scripts help – we ask guests: ‘Is this an airborne, contact, or ingestion-only allergy?’ This simple question has prevented numerous incidents in our kitchen.
– Professional Chef Experience
Adopting these professional standards in your home kitchen is essential for ensuring the safety and enjoyment of all your guests. It fosters an environment of trust and care, which is the cornerstone of true hospitality.
Your Action Plan: Clean Kitchen Protocol for Nut Allergy Safety
- Sanitize Surfaces: Begin by washing all countertops and work areas with hot, soapy water, followed by a disinfectant solution.
- Dedicate Equipment: Use separate cutting boards and utensils (glass or stainless steel are best). Clean your blender thoroughly by running an empty cycle with soap and rinsing it three times.
- Sequence Your Prep: Always prepare and store any nut-free dishes completely before you begin handling cashews to prevent any risk of cross-contamination.
- Label Everything Clearly: Use tent cards or labels to clearly mark all dishes containing nuts. Also, use separate serving utensils for each dish at the table.
- Store Separately: Keep finished cashew dishes physically separate from nut-free dishes, both in the kitchen and on the serving table.
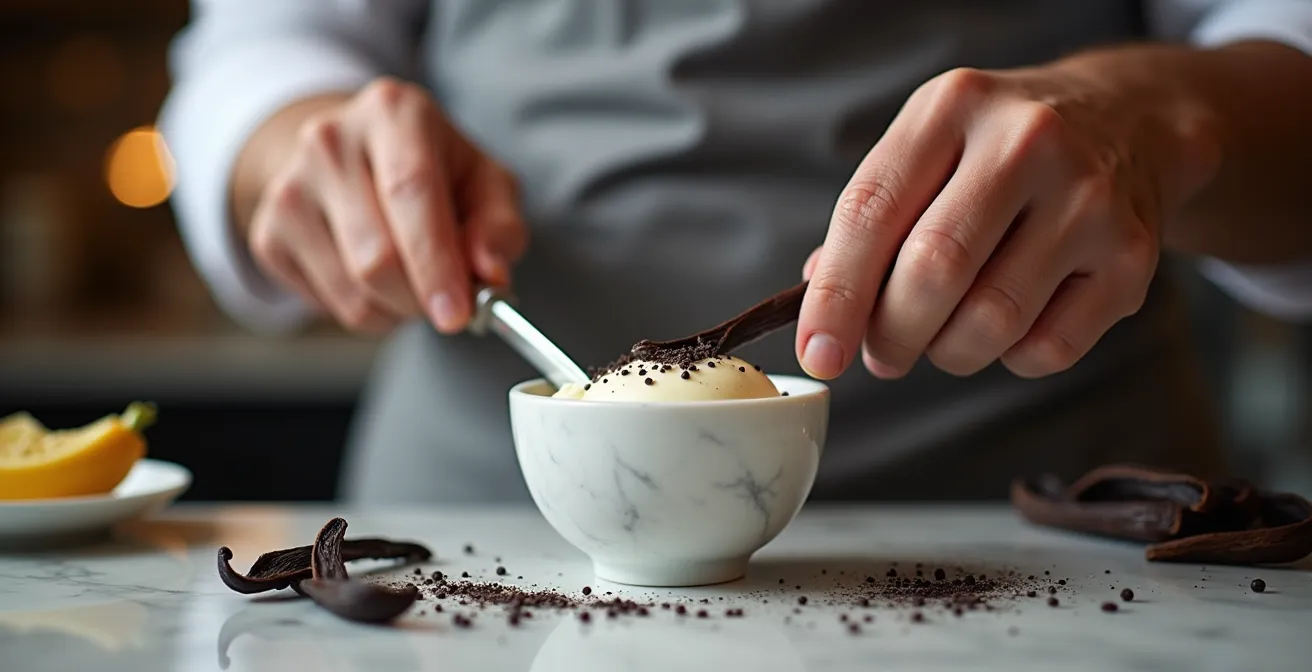
How to Neutralize the Nutty Flavor for Sweet Cream Desserts?
While the subtle, nutty flavor of cashews is desirable in savory cheeses, it can be an unwelcome guest in delicate sweet creams, cheesecakes, or frostings. The goal in these applications is a clean, neutral canvas that allows flavors like vanilla, chocolate, or fruit to shine. The standard soaking method helps, but for a truly imperceptible base, a professional pastry technique is required: blanching and shocking. This culinary maneuver does more than just soften the nuts.
Blanching raw cashews in boiling water for a very short time helps to wash away surface compounds that contribute to the “nutty” taste. The immediate transfer to an ice bath—the “shock”—is critical. It halts the cooking process instantly, preserving the nut’s firm texture and preventing it from becoming mushy. This process effectively “resets” the cashew’s flavor profile, rendering it remarkably neutral. It’s the secret to creating cashew-based desserts where the main flavor, like a high-quality vanilla bean, can take center stage without competition.
This technique elevates your dessert game from simply “good for a vegan dessert” to genuinely exquisite by any standard. To achieve the most neutral flavor possible, follow these precise steps:
- Bring a large pot of water to a rolling boil.
- Add the raw cashews and blanch for exactly 60 seconds. Any longer, and they will start to cook.
- Using a slotted spoon, immediately transfer the cashews to a large bowl of ice water to shock them and stop all enzyme activity.
- Once completely cool, drain the cashews and rinse them thoroughly under cold running water.
- For an extra level of neutrality, perform a final soak in fresh, cold water for 15 minutes to wash away any residual compounds, then rinse again before blending.
Nutritional Yeast 101: How to Use “Nooch” for Cheesy Flavor?
Nutritional yeast, or “nooch,” is the cornerstone of flavor architecture in vegan cheese making. Its savory, nutty, and distinctly cheesy taste is indispensable. However, simply stirring it into a cashew base is a rookie mistake. To unlock its full potential and build a flavor profile with depth and complexity, you must understand how to handle it. The most transformative technique is to lightly toast the nutritional yeast in a dry pan before adding it to your blender.
This simple step, taking less than a minute, initiates a Maillard reaction—the same chemical process that gives seared steak and toasted bread their deep, savory flavors. As noted by experienced chefs, toasting nutritional yeast deepens its flavor from a simple “cheesy” note to a complex, roasted, almost Parmesan-like profile. This single action elevates the final product from a simple sauce to something with genuine umami character. But nutritional yeast shouldn’t work alone. It’s a team player that shines brightest when combined with other umami-rich ingredients.
As the pioneering vegan cheesemaker Miyoko Schinner explains, building a truly memorable cheese flavor is about synergy. It’s not about one ingredient, but how several components meld together to create something greater than the sum of their parts.
Nutritional yeast is a team player. The formula for a flavor bomb: Nutritional Yeast for cheesiness + White Miso Paste for funky depth + Onion Powder for savory sweetness. When added during blending, not stirred in after, the flavors fully meld.
– Miyoko Schinner, Artisan Vegan Cheese Cookbook
By toasting your nooch and pairing it with complementary ingredients like miso and onion powder during the blending process, you move from just mimicking cheese to creating a sophisticated and deeply satisfying flavor profile from the ground up.
Constructing the Perfect Vegetable Lasagna: Preventing the Watery Mess
A vegetable lasagna can be a masterpiece of layered flavors, but it often ends in a soupy, watery disappointment. The culprit is almost always excess moisture released from the vegetables during baking. While many focus on the tomato sauce, the real key to a firm, sliceable lasagna lies in two areas: pre-treating the vegetables and choosing the right “ricotta.” Cashew ricotta isn’t just a substitute here; it’s a structural upgrade.
High-moisture vegetables like zucchini and eggplant must be “de-gorged” before they ever enter the lasagna dish. The classic “salt and sweat” method is non-negotiable. By salting the vegetable slices and allowing them to sit, you draw out a surprising amount of water. A subsequent roast in a hot oven not only removes more moisture but also concentrates their flavor. This two-step process is the foundation of a structurally sound lasagna.
The second part of the solution is the cashew ricotta itself. Unlike its dairy counterpart, which can also weep liquid when baked, cashew ricotta is a brilliant binder. Its starch content helps it firm up and absorb excess moisture from the surrounding sauce and vegetables, creating a cohesive, stable layer.
| Property | Dairy Ricotta | Cashew Ricotta |
|---|---|---|
| Moisture Content | High – weeps liquid during baking | Low – absorbs excess moisture |
| Binding Power | Moderate | Excellent – starches help bind layers |
| Texture After Baking | Can become watery | Firms up, holds structure |
| Ideal Water Ratio | As-is from container | 1 cup cashews : 1/3 cup water max |
To ensure your lasagna holds its shape, follow this vegetable preparation method precisely:
- Slice zucchini, eggplant, or other high-moisture vegetables into 1/4-inch rounds.
- Salt both sides of the slices generously and place them in a colander in the sink. Let them sit for 30-45 minutes to “sweat” out their moisture.
- Pat the slices thoroughly dry with paper towels until they feel firm.
- Roast the dry slices on a baking sheet at 425°F (220°C) for 15-20 minutes, until their edges are golden.
- Allow the roasted vegetables to cool completely before layering them into your lasagna to prevent steam from creating more moisture.
Key takeaways
- The primary purpose of soaking cashews is mechanical—to soften them for a smoother blend—not primarily for nutritional reasons like reducing phytic acid.
- Achieving a silky texture without a high-end blender is possible through the “Double Blend Technique,” which relies on a resting period for full particle hydration.
- For blended applications, buying cashew pieces instead of whole cashews can save up to 40% without any compromise in quality, as the nutritional content is identical.
Which Dairy-Free Nut Milk Innovation Foams Best for Latte Art?
The final frontier for many homemade dairy-free milks is the coffee bar: can it create stable, velvety microfoam worthy of latte art? While many plant milks fall flat, a properly constructed homemade cashew milk can perform exceptionally well. The secret to success lies in the emulsification science of building a “barista blend” from scratch. It’s about creating a higher fat and protein content, and then adding a crucial stabilizer to hold it all together under the heat and pressure of a steam wand.
A standard, watery cashew milk won’t work. For frothing, you need a richer ratio, typically one part cashews to three parts water. But the real game-changer is the addition of an emulsifier. A tiny amount of sunflower lecithin or xanthan gum acts as the glue that prevents the milk from separating into water and fat when heated. This creates a stable emulsion that can trap air to form a dense, glossy microfoam. Temperature control is also vital; overheating will “cook” the proteins and destroy the foam. The optimal frothing temperature for a rich cashew milk is between 140-150°F (60-65°C), where you get maximum volume without compromising the structure.
Crafting your own barista-grade cashew milk gives you complete control over the final product, free from the gums and additives in many commercial versions. Here is the blueprint for a milk that foams beautifully:
- Use a Rich Ratio: Blend 1 cup of soaked raw cashews with 3 cups of fresh, cold water.
- Add a Stabilizer: Add 1/4 teaspoon of sunflower lecithin or a tiny pinch (less than 1/8 teaspoon) of xanthan gum per liter of milk. This is the most critical step for a stable emulsion.
- Blend for Emulsification: Blend on your blender’s highest speed for a full 2 minutes to ensure the fats, water, and stabilizer are completely homogenized.
- Strain for Smoothness: Pour the milk through a nut milk bag and squeeze thoroughly to remove all pulp. This is essential for achieving the fine texture needed for microfoam.
- Chill Completely: For the best frothing results, chill the milk for at least 2 hours before steaming. Cold milk foams better.
With these techniques in your culinary toolkit, you are no longer just making substitutes. You are an artisan, equipped with the knowledge to craft exceptional, dairy-free cheeses, creams, and milks that stand proudly on their own. The journey starts with a single cashew; begin your experiments today and discover the incredible versatility that awaits.